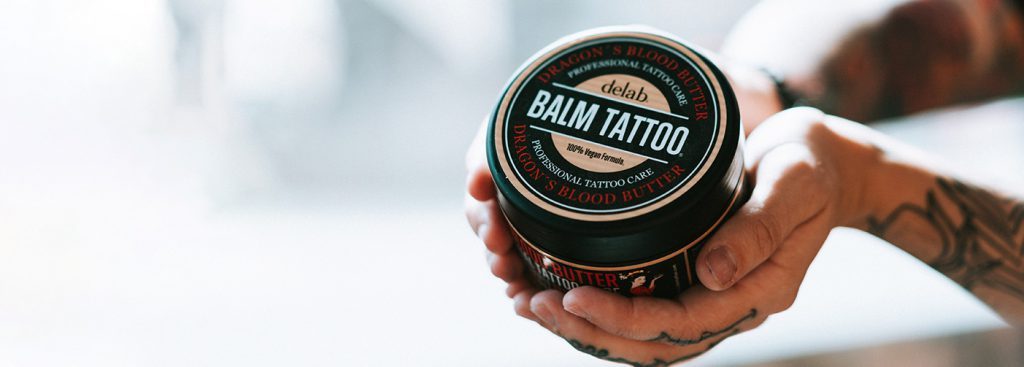
All of the aftercare products recommended by Rock'n'Roll Tattoo - can be found on our online store at:
www.shop.rocknroll-tattoos.com or www.balmtattoo.co.uk

Tattoo aftercare
Your new tattoo has involved breaking the skin, and there is a possibility that if not cared for properly, your tattoo may end up damaged or worse. By following the advice provided in this leaflet you will be reducing the chance of anything going wrong with your new tattoo.
How to Treat your tattoo
1. KEEP wearing the dressing: This is applied by your tattooist for around 4 hours (this should allow enough time for your tattoo to stop bleeding or weeping).
2. REMOVE the dressing and wash your tattoo gently with anti-bacterial soap (we recommend balm tattoo soap-free soap) and warm water
3. Dry it gently with a clean tissue - use paper towels, or use only one cotton towel specifically for your tattoo.
4. apply a fresh dessing (cling film) on your tattoo.
Repeat the same procedure for the next 3 days every 4 hours to protect your tattoo from clothes and other factors in the environment and keep it clean.
When you stop wearing cling film, for the next 2-3 days we recommend applying Balm tattoo ointment 3-4 times a day to keep your tattoo moisturised, promote skin regeneration and maintain the vibrancy of your new tattoo.
After this period you can reduce the frequency of application of Balm tattoo ointment, continue to use it until the skin is no longer shiny as this means your tattoo is now fully healed.
do not!
• Pick or scratch the tattoo or the scabs which might appear on your skin (it can affect the tattoos quality)
• soak your tattoo for two weeks and avoid unnecessary water exposure (no swimming, pools or baths)
• Expose to the sun/go on sun beds for at least one month!
If you have any problems or questions at any time, please contact your tattooist or the studio directly to ask for advice.
Piercing aftercare
Use one or both of the following solutions for healing piercings:
• Packaged sterile saline (with no additives, read the label) is a gentle choice for piercing aftercare. If sterile saline is not available in your region a sea salt solution mixture can be a viable alternative. Dissolve 1/8 to 1/4 teaspoon (.75 to 1.42 grams) of non-iodized (iodine-free) sea salt into one cup (8 oz / 250 ml) of warm distilled or bottled water. A stronger mixture is not better; a saline solution that is too strong can irritate the piercing.
Cleaning Instructions for Body Piercings
• WASH your hands thoroughly prior to cleaning or touching your piercing for any reason.
• SALINE soak for five to ten minutes once or more per day. Invert a cup of warm saline solution over the area to form a vacuum. For certain piercings it may be easier to apply using clean gauze or paper towels saturated with saline solution.
• If your piercer suggests using soap, gently lather around the piercing and rinse as needed. Avoid using harsh soaps, or soaps with dyes, fragrances, or triclosan.
• RINSE thoroughly to remove all traces of the soap from the piercing. It is not necessary to rotate the jewellery through the piercing.
• DRY by gently patting with clean, disposable paper products. Cloth towels can harbor bacteria and snag on jewellery, causing injury.
What is Normal?
• Initially: some bleeding, localized swelling, tenderness, or bruising.
• During healing: some discoloration, itching, secretion of a whitish-yellow fluid (not pus) that will form some crust on the jewellery. The tissue may tighten around the jewellery as it heals.
• Once healed: the jewellery may not move freely in the piercing; do not force it. If you fail to include cleaning your piercing as part of your daily hygiene routine, normal but smelly bodily secretions may accumulate.
• A piercing may seem healed before the healing process is complete. This is because tissue heals from the outside in, and although it feels fine, the interior remains fragile. Be patient, and keep cleaning throughout the entire healing period.
• Even healed piercings can shrink or close in minutes after having been there for years! This varies from person to person; if you like your piercing, keep jewellery in—do not leave it empty.
What To Do
• Wash your hands prior to touching the piercing; leave it alone except when cleaning. During healing, it is not necessary to rotate your jewellery.
• Stay healthy; the healthier your lifestyle, the easier it will be for your piercing to heal. Get enough sleep and eat a nutritious diet. Exercise during healing is fine; listen to your body.
• Make sure your bedding is washed and changed regularly. Wear clean, comfortable, breathable clothing that protects your piercing while you are sleeping.
• Showers tend to be safer than taking baths, as bathtubs can harbor bacteria. If you bathe in a tub, clean it well before each use and rinse off your piercing when you get out.
What To Avoid
• Avoid moving jewellery in an unhealed piercing, or picking away dried discharge with your fingers.
• Avoid cleaning with Betadine®, Hibiciens®, alcohol, hydrogen peroxide, Dial® or other soaps containing triclosan, as these can damage cells. Also avoid ointments as they prevent necessary air circulation.
• Avoid Bactine®, pierced ear care solutions and other products containing Benzalkonium Chloride (BZK). These can be irritating and are not intended for long term wound care.
• Avoid over-cleaning. This can delay your healing and irritate your piercing.
• Avoid undue trauma such as friction from clothing, excessive motion of the area, playing with the jewellery, and vigorous cleaning. These activities can cause the formation of unsightly and uncomfortable scar tissue, migration, prolonged healing, and other complications.
• Avoid all oral contact, rough play, and contact with others’ bodily fluids on or near your piercing during healing.
• Avoid stress and recreational drug use, including excessive caffeine, nicotine, and alcohol.
• Avoid submerging the piercing in unhygienic bodies of water such as lakes, pools, hot tubs, etc. Or, protect your piercing using a waterproof wound-sealant bandage (such as 3M™ Nexcare™ Clean Seals). These are available at most drugstores.
• Avoid all beauty and personal care products on or around the piercing including cosmetics, lotions, and sprays, etc.
• Don’t hang charms or any object from your jewellery until the piercing is fully healed.
HINTS AND TIPS - Jewellery
• Unless there is a problem with the size, style, or material of the initial jewellery, leave it in the place for the entire healing period. See a qualified piercer to perform any jewellery change that becomes necessary during healing. See the APP website to locate an APP member, or to request a copy of our Picking Your Piercer brochure.)
• Contact your piercer if your jewellery must be removed (such as for a medical procedure). There are non-metallic jewellery alternatives available.
• Leave jewellery in at all times. Even old or well-healed piercing can shrink or close in minutes even after having been there for years. If removed, re-insertion can be difficult or impossible.
• With clean hands or paper product, be sure to regularly check threaded ends on your jewellery for tightness. (“Righty-tighty, lefty-loosey.”)
• Should you decide you no longer want the piercing, simply remove the jewellery (or have a professional piercer remove it) and continue cleaning the piercing until the hole closes. In most cases only a small mark will remain.
• In the event an infection is suspected, quality jewellery or an inert alternative should be left in place to allow for drainage of the infection. If the jewellery is removed, the surface cells can close up, which can seal the infection inside the piercing channel and result in an abscess. Do not remove jewellery unless instructed to by a medical professional.
Laser aftercare
The best thing you can do in the next 24 hours is nothing. Rest and Relaxation are the top of the
list for best results. You don’t have to stay in bed, but avoid strenuous exercise for at least 24 hours.
Wash the area 2-3 times a day and pat dry, then apply a thin layer of Laser Balm Ointment
(available in the studio) for up to 2 weeks.
Avoid submerging the area in water (Baths, Swimming etc). Avoid direct sun exposure, sun beds
and fake tan for up to 2 weeks.
There are several common side effects from Laser such as Redness, Swelling, Blistering, Itchiness and Dryness. You can expect to have at least some of these immediately after and the weeks after your laser session. If you experience any, check out our guide below.
Redness: Your skin can become red immediately after your laser session, this can last up to
48hours, and is caused by pinpoint bleeding following the session. It is very rare to see blood
following a session of removal, however it can occur and should not be excessive. If you find you’re bleeding more than you think is normal, please contact the studio or seek medical advice. Avoid strenuous exercise that can cause friction on the area, and make sure to pat dry after a shower.
Swelling:
Swelling is normal, and the most common side effect after a laser session. Applying a cool
pack to the area (frozen peas will do) will help with this, as well as applying Laser Balm Ointment to the area as this contains aloe vera and has a cooling effect as well as its healing properties. Elevating the area will also help with swelling but this is only really needed in extreme cases.
Blistering:
The one everyone worries about, we’ve all seen the images on social media. Blistering is
not as common as people think, about 1 in 10 clients experience it, and it is perfectly normal. They are your body’s way of protecting your skin after it has become irritated by the laser, and they stop bacteria from coming into contact with the irritated area. Try not to burst your blister, but we understand how easy they do burst, so if they do, take extra care to keep the area clean and continue to apply Laser Balm Ointment to the area.
Itchiness:
The area can become extremely itchy after your session, for up to 4 weeks. An over the
counter antihistamine can help with symptoms, but please do not scratch the the affected area.
Dryness and Scabbing:
After a week or so a scab can start to form, sometimes the affected area
can look worse than it is and even look darker, but don’t worry, once the scanning has healed and the area starts to return to normal the affected area will start to appear lighter. Never pick the scab, as this can cause scarring, the scab will fall away itself when the area is healed, please be patient.
Stick with your aftercare, it is critical to keep up your aftercare routine, because it helps your
body to heal better and faster, and this will have a real impact on outcome of your removal. It
will also make future appointments safer and more effective.
We will not Laser you any sooner than every 6 weeks, and may sometimes ask you to wait
longer depending on how your skin is looking after the initial 6week period. Every person
reacts differently to tattoo removal, patience is key.
Just keep your mind on how good your new tattoo will look after the fading.
For more information: laserscotland@rocknroll-tattoos.com

